Gym Exercises
What are the 3 important points to remember to Strength Train safely?
Do the exercise only as long as
the form is good
only straining body part being work on and nowhere else
till you can keep the movement slow (smooth)
Common points to remember for all Gym Machine Exercises:
Familarize yourself with the exercise
With the help of the stickers on the exercise machine, make yourself aware of the muscle groups that'll be loaded while doing this exercise.
Familarize yourself with start and finish position of the exercise.
Understand the exercise itself.
Set up machine
Select an appropriate training weight.
Your Posture and Position
Sit tall like a puppet on seat.
Test ROM (Range of Motion)
Do a "trial exercise" correctly without any weights and note reading on the ROM scale.
Look out for slouching, shrugged shoulders and having too tight a grip. Grip needs to be 5-6 on a scale of 10. Imagine you are crucshing the orange between your shoulder blades.
Exercise
Select an appropriate training weight. It's advisable to start with lower weight than you think you can.
Before increasing weight, it is important to make sure you become comfortable with the movement. Probably don't increase the weight for 2-3 sessions.
Understand exercise in detail as below.
Rhythm of exercise. 4 - 2 - 4. Pull elbows down slowly over 4 seconds, hold for 2 seconds, and slowly take the elbows up over 4 seconds.
Do not hold the breath while exercising. Keep breathing easy, long breaths in and out.
You should be able to feel the muscles being worked on, to be loaded.
If it is straining anywhere else, you should restart, change settings or reduce weight.
Make sure breathing is easy at all times.
Repeat the same movement till the point of local fatigue.
Stop once you are unable to achieve a maximum contraction or fall short of full Range of Motion.
Exit machine.
Conclude exercise with a massive smile from ear to ear. It improves your face value.
Below are some gym exercises that’ll get you back on your journey to becoming your best.
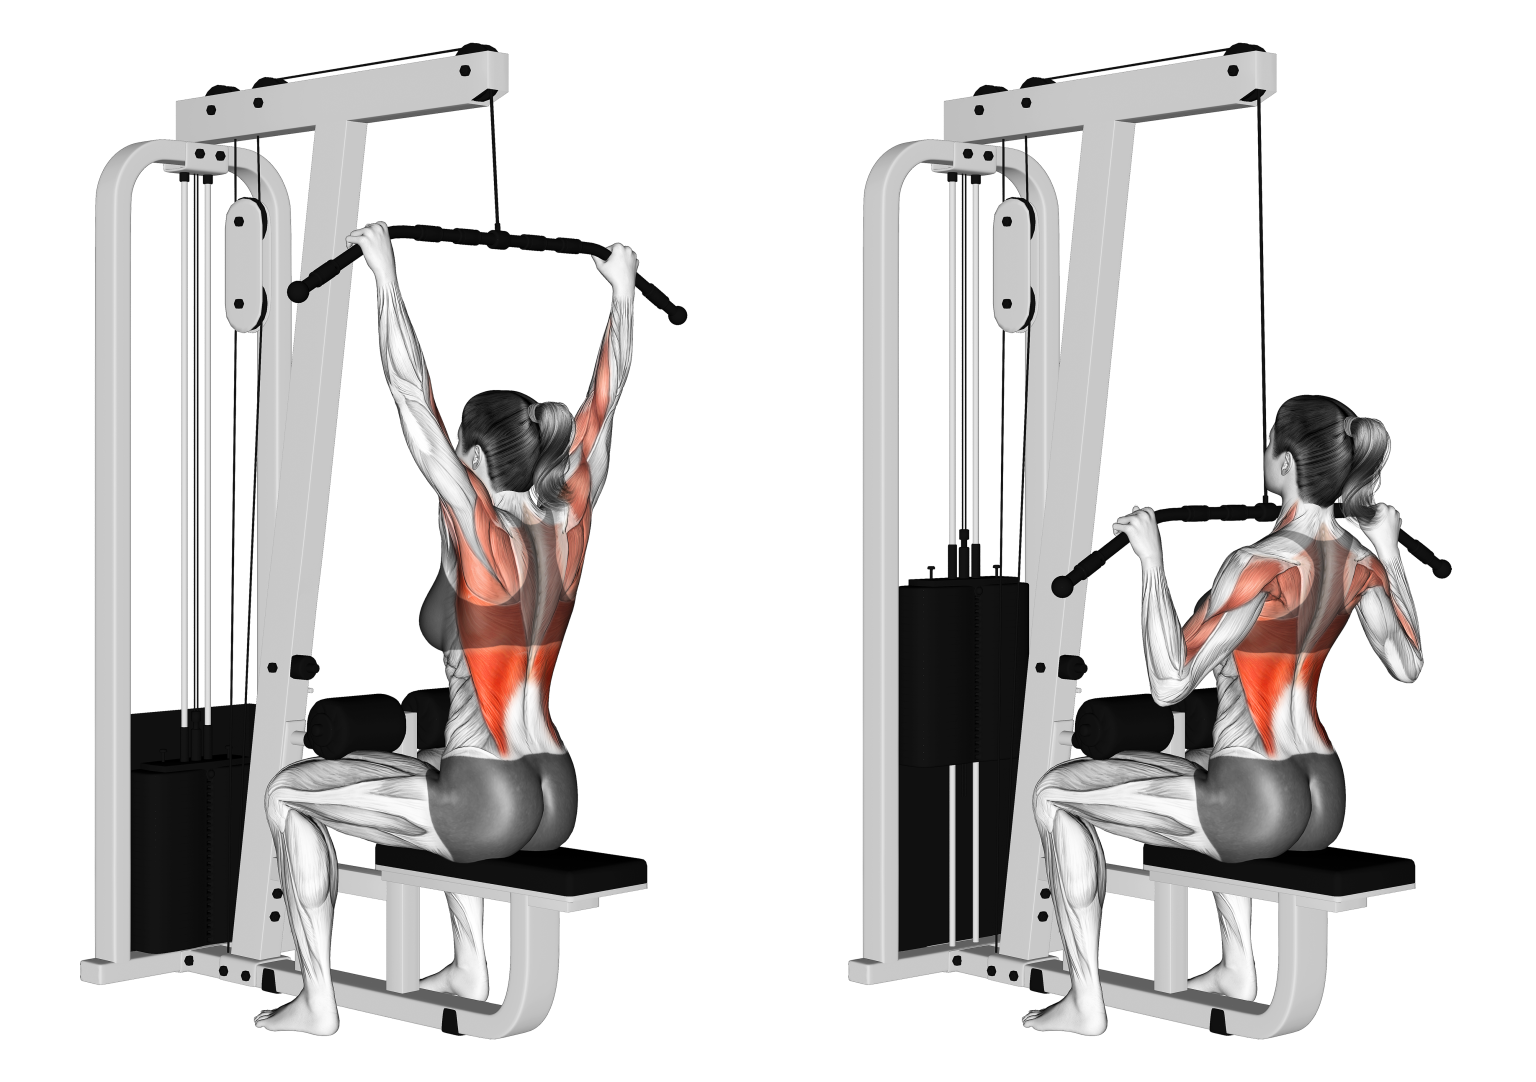
Lat Pull Down
Sit tall like a puppet on seat.
Adjust the roll over your thighs such that it fixes them and doesn't let them move freely.
Most of you may be unable to grip the handholds while sitting down. That's fine. Instructor or partner should pull them down for you, so that you don't need to get up to hold the handholds.
Make sure that you are sitting tall slightly leaning forward and shoulders in neutral position.
Imagine there is a string on the top of your head pulling you up. Keep that posture. Now imagine that string is being pulled slightly forwards too, making you lean forwards.
Do not shrug the shoulders.
You might feel there are strings on your shoulders pulling you up. Chop off those strings and let the shoulders go, as if falling down.
Make sure your shoulders are in neutral position.
Neutral: Take the shoulders all the way forwards, then all the way back, and then somewhere in between the two positions will be the neutral position.
Have the feet slightly ahead of your knees and firmly placed on the ground.
Have a wide grip, holding at end.
Don’t place hands in bent part of handhold.
Remember to relax the shoulders again. Do not shrug your shoulders.
Trainer or partner pulls down the rod till it reaches your hands and then you take a wide grip.
Your elbows are straight in start position, while being firmly seated on the seat.
Keep upper body straightened leaning slightly forward throughout exercise.
Lower movement arm pushing elbows to rear (back) while keeping them close to body.
At no time should elbows be in front of body, as otherwise the latissimus dorsi muscle is not being worked effectively. In the end position the upper arms should be parallel (or slightly below) to the upper body and must not be pointing backwards.
Keep wrists in line with the lower arms.
Keep the head in line with the theoretical extension of the spine. In simple terms, think your head is being pulled up.
Isolates the latismus dorsi muscles while doing this exercise, as shown in the illustration.
Relax rest of your body.
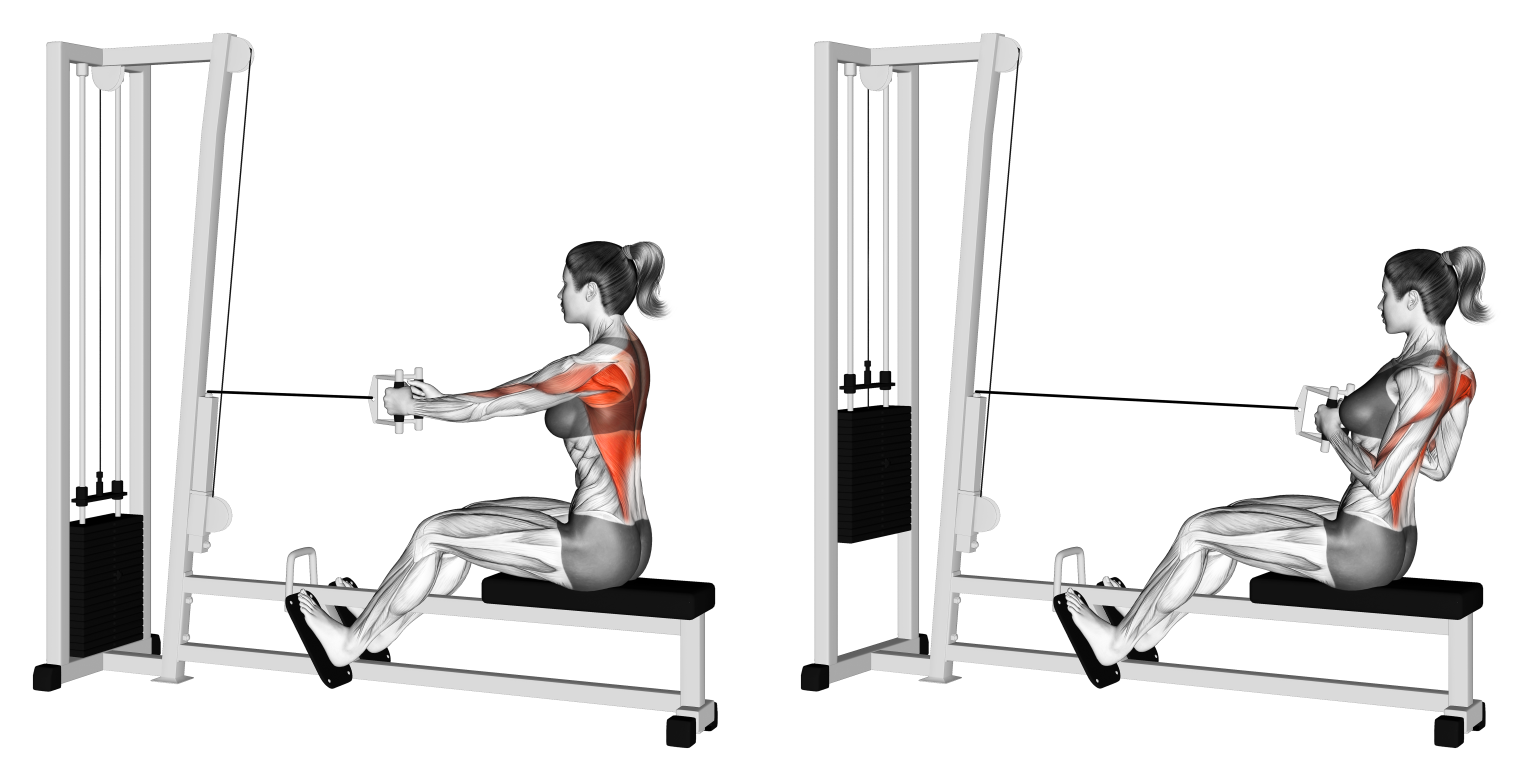
Mid Back Row
Sit tall like a puppet on seat.
Unlike Pull Down, in this exercise thighs don't need to be stabilised under a roller. Hold the handle bars and shuffle all the way back.
Make sure you are sitting tall slightly leaning forward.
Imagine there is a string on the top of your head pulling you up. Keep that posture imagine that string is being pulled slightly forwards too, making you lean forwards, i.e. by 2-3°.
Remember not to shrug the shoulders.
You might feel there are strings on your shoulders pulling you up. Chop off those strings and let the shoulders go, as if falling down.
Make sure your shoulders are in neutral position.
Neutral: Take the shoulders all the way forwards, then all the way back, and then somewhere in between the two positions will be the neutral position.
Have the feet slightly ahead of your knees and firmly placed on the ground.
At the start position have the elbows very slightly bent, not fully straightened.
Move elbows back as far as possible.Slowly move elbows back evenly and closely to the body until elbows are behind body and closer together.
Do not raise the shoulders. Relax the shoulders down and let them down.
Sit tall like a puppet throughout the exercise.
Make sure the imaginary string between the breast bone and belt buckle is stretched out, pulling the chest up.
Keep wrists in line with forearms.
When pulling the weight back, avoid bending the wrist.
Make sure that weight is not touching down in start position.
If the weight is touching down, you need to shuffle back further.
Isolates the upper and middle back muscles while doing this exercise.
Pec Fly

Set seat height such that your feet are firmly placed on the ground.Sit on seat.
Slide buttocks back until against the backrest.Lean on backrest and sit tall.
Hold on to the black handle bars and bring them in front without raising the weights.
Trainers will explain this to you.
Place your hands on the two black handle bars.
The upper arms should be parallel to the floor, the forearms vertical and the elbows at an angle of 90°.
Shoulders should not be shrugged.
Some of you might want to have the handle setting on 2, but usually it's recommended to be on 1.
It's not hands or elbows but chest that is worked on in this machine.
Bring the bars in front of body until reaching the position of maximum contraction.
Return arms towards the start position but to stop as soon as a slight stretch is experienced in the pectoral muscle / chest.
What you perceive as a slight stretch will of course vary. However, your arms should, at max, be slightly behind the body (maximum 190°).
Position your hands on the bar as before. Bring hands slowly towards each other, the strain is from the chest, not the elbows or hands.
Make sure that the load is on the chest.
Too tight a grip can strain the elbows, leading to elbow pain. So have a loose grip (5-6/10).
Make sure back remains firmly on the backrest throughout the exercise.
No other part of the body besides chest should strain.Isolate the chest muscles.
Load should only be felt on chest muscles.
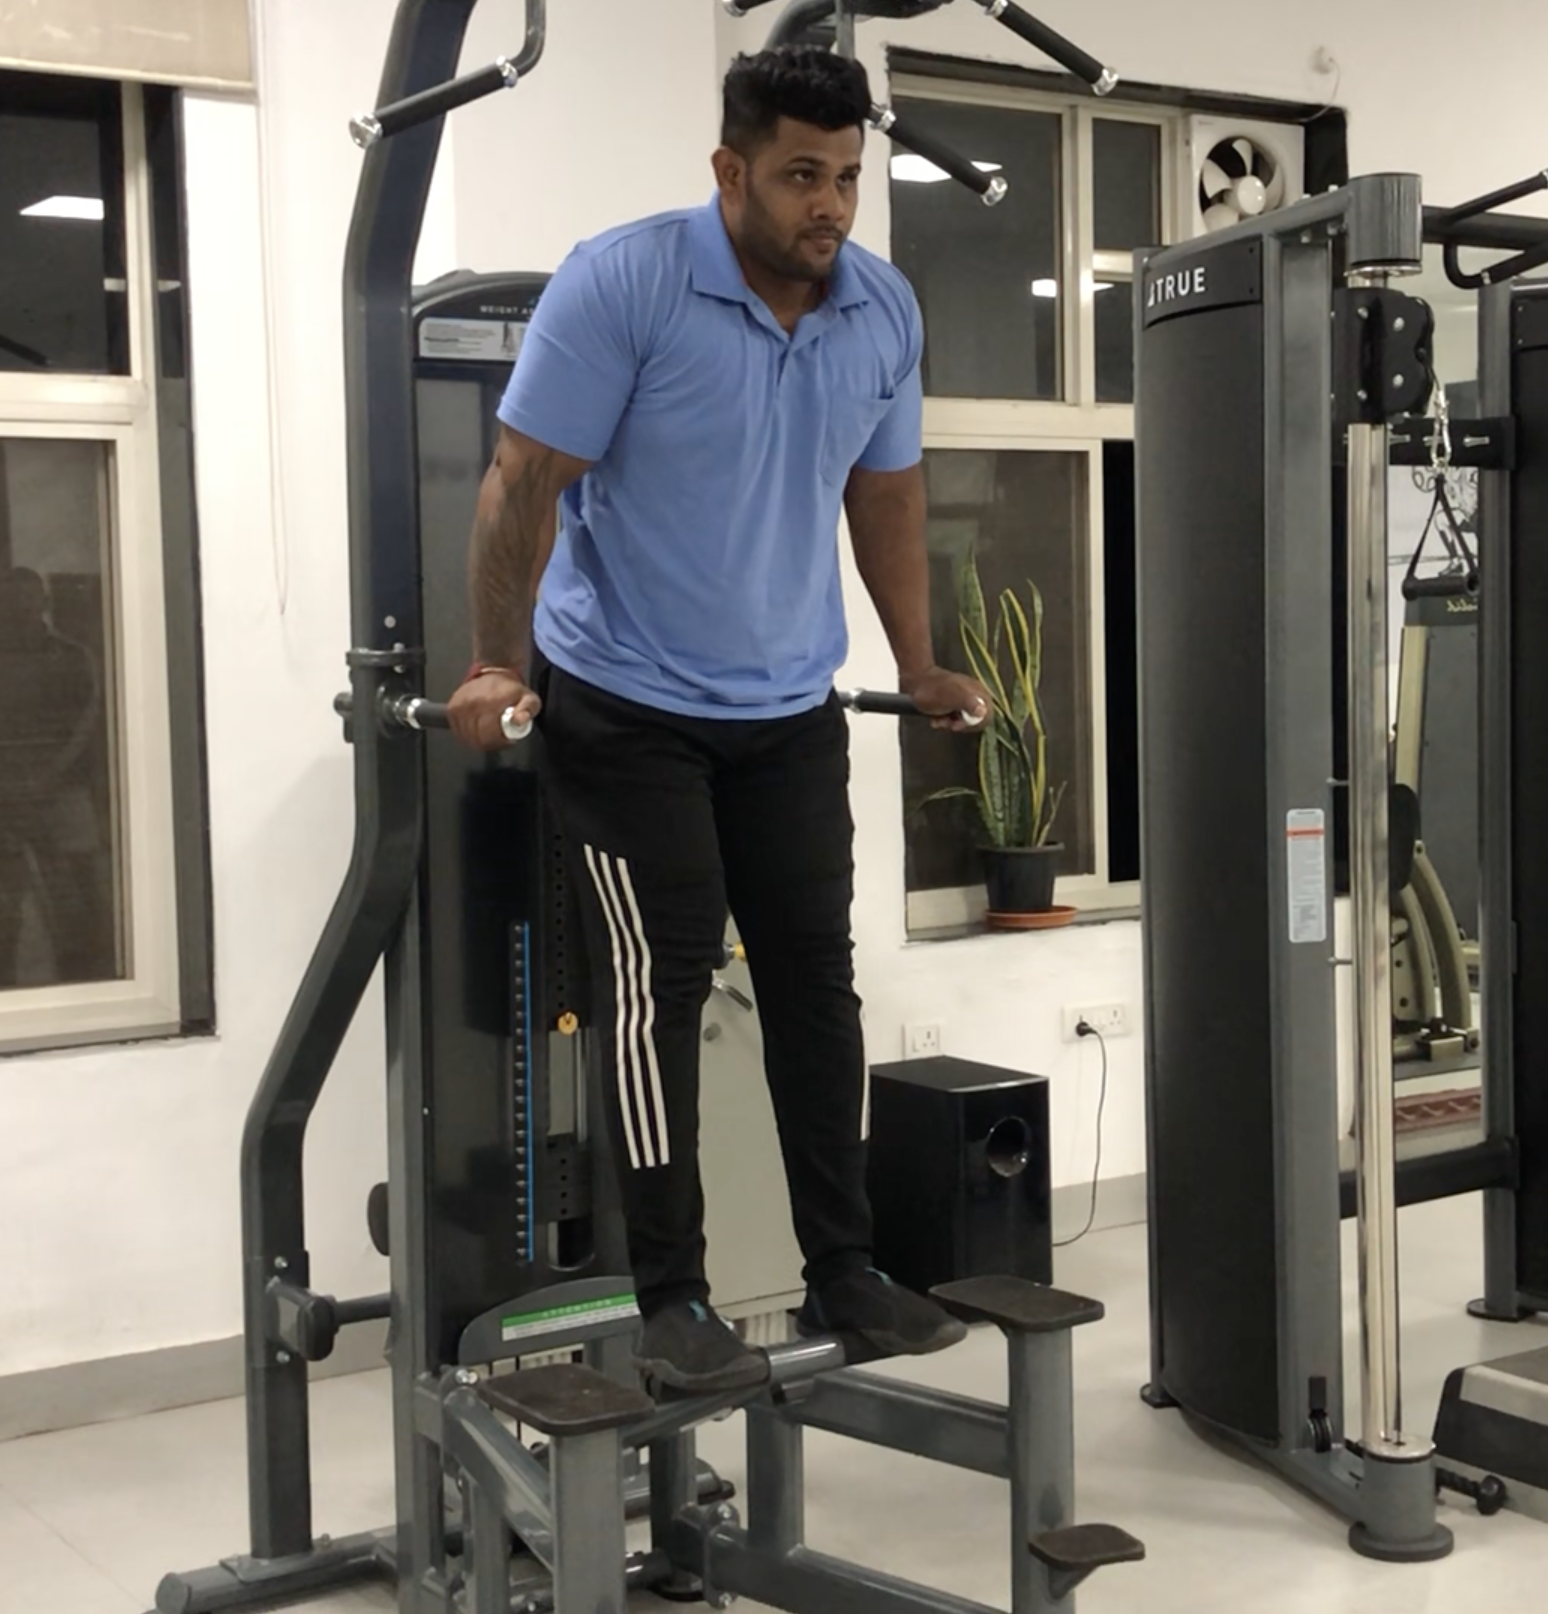
Pull Up - Assisted

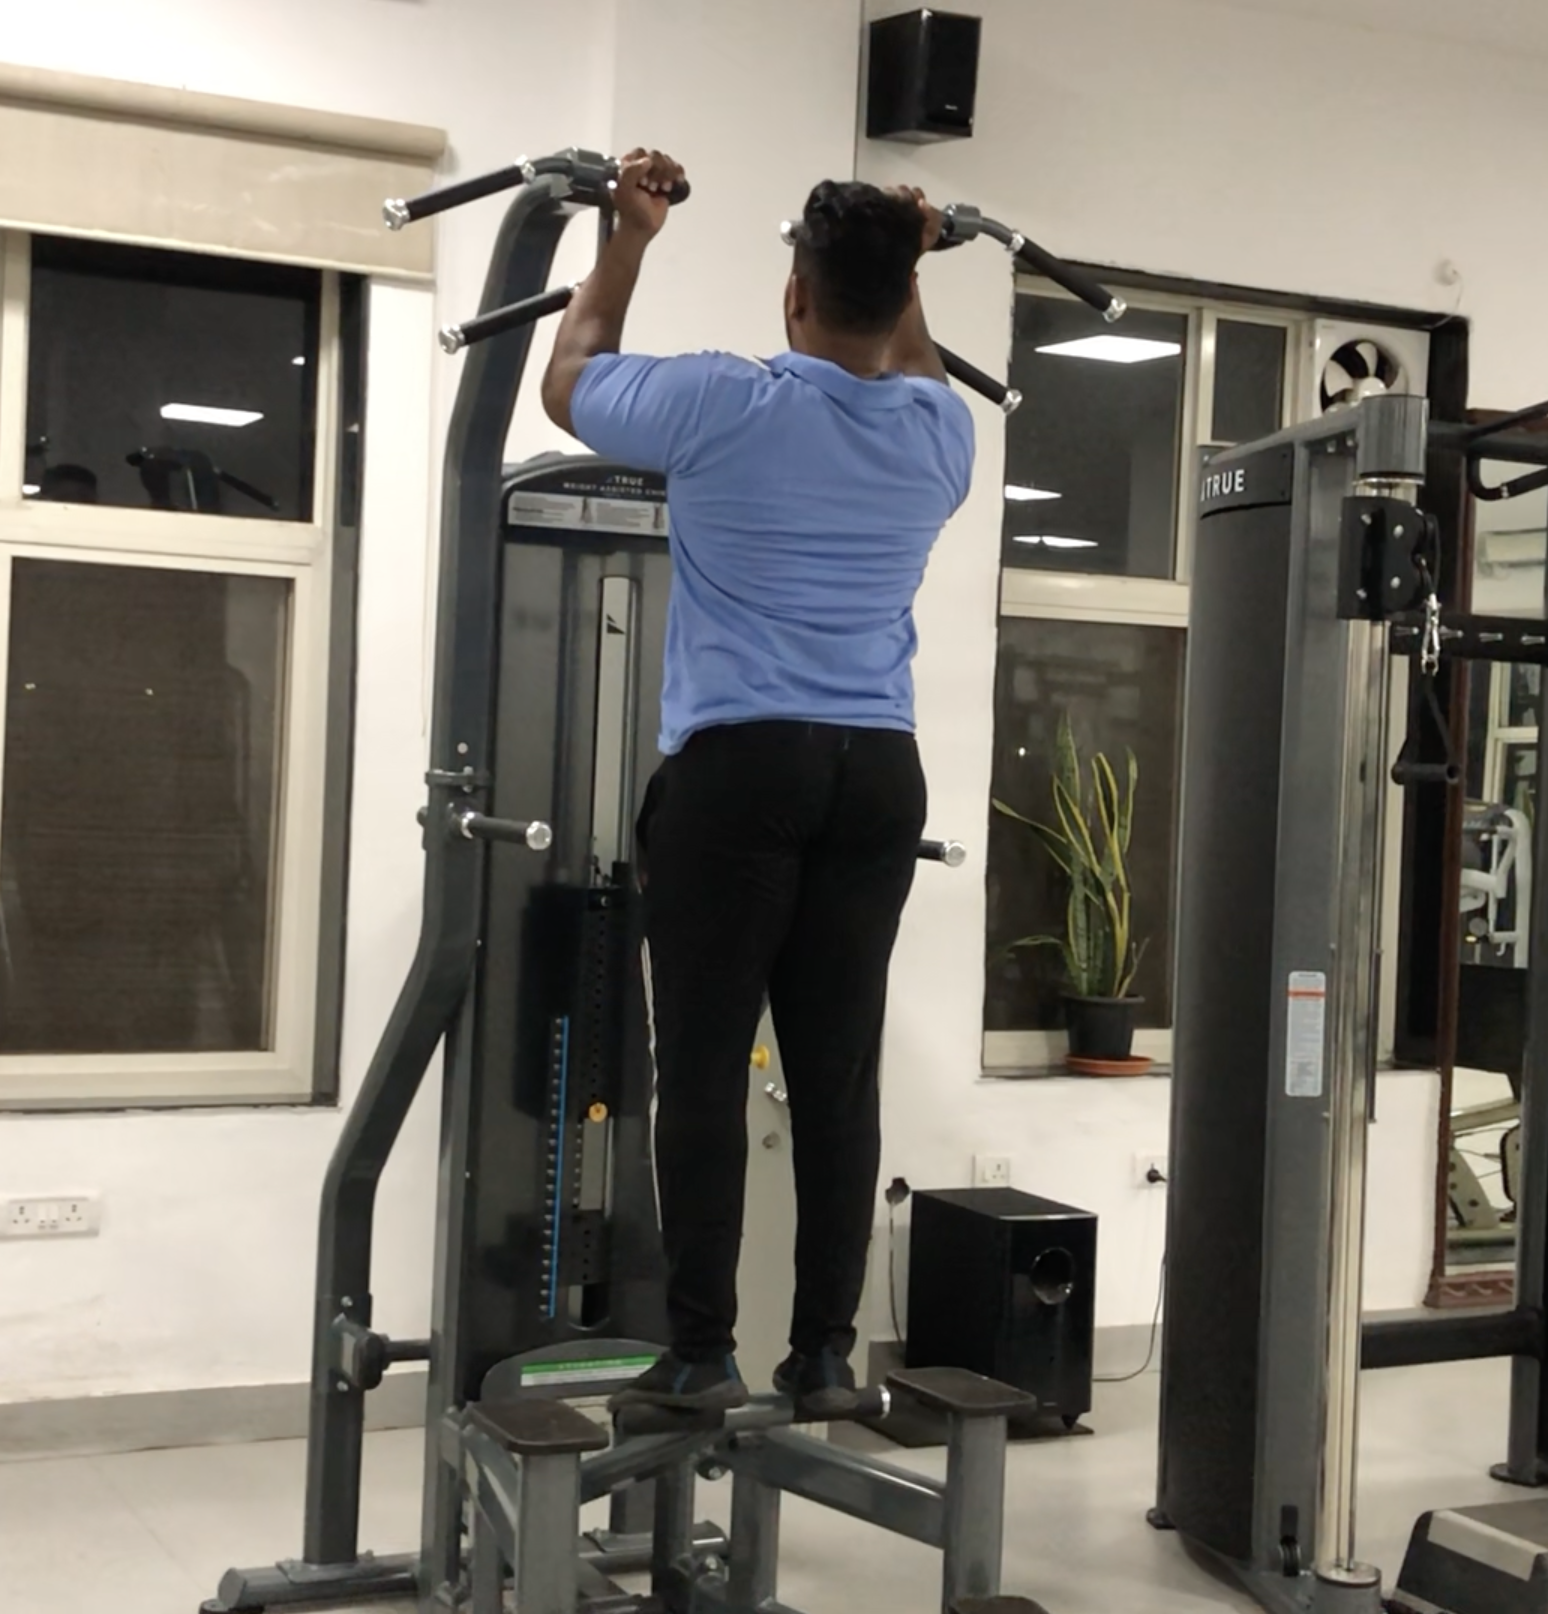
The machine at NPA is slightly different from the one shown above. In any case, this machine is the perfect example of how machines can be used to gradually put more load and soon succeed, otherwise you’ll keep trying to lift your whole body weight for long and not get any where.
Note: legs are straight and the grip has fingers facing towards your body.
Select an appropriate training weight.
In this machine weights play the reverse role. The heavier the weight, the easier it is going to be for you to do this exercise. A good weight to start with is the your body weight.
Select inner pull-up handle position as shown in the pic.
While holding the inner grip on pull up bar, stand on the assist bar.At the start position elbows to be bent at 90°.
Keep body in a straight line from knees to shoulders. Hips extended.
Slowly lower the body, straightening the elbows (but not locked), with controlled movement to a comfortable level.
Slowly start to raise your body up while bending the arms to come back up slowly to the start position. There is should be no stopping at this position.
At all times breathing should be easy and at no point should be held. Breathing should not be forced.
Make sure not to swing your to and fro while doing this exercise.Isolate the muscles as shown in the illustration.
Dip - Assisted


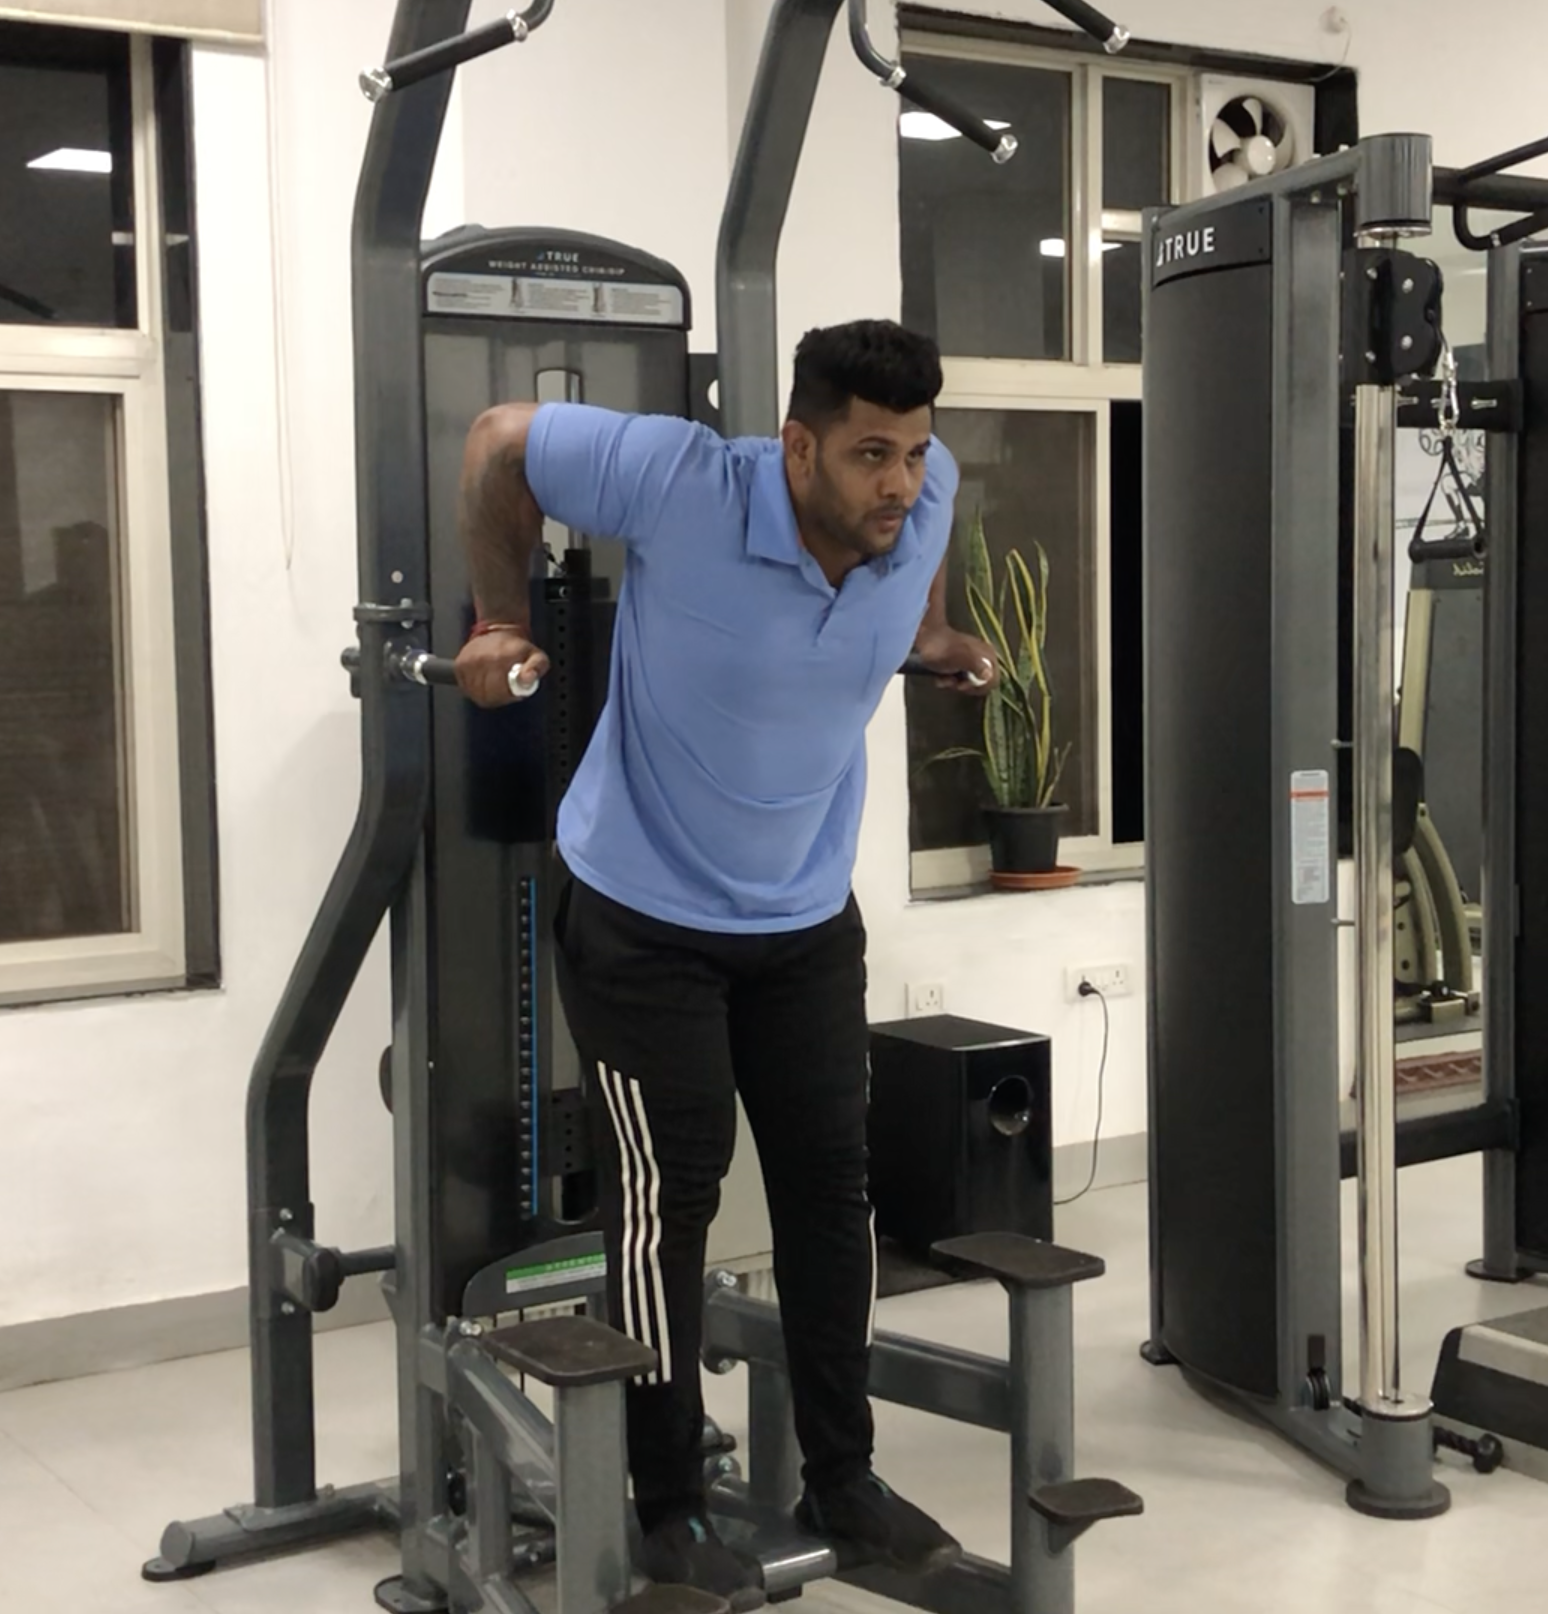
In this machine weights play the reverse role. The heavier the weight, the easier it is going to be for you to do this exercise. A good weight to start with is the your body weight.
Pull the assist bar down as you stand on it to do the exercise. Select inner dip handle position.
If you struggle to fit in, it's better to start with outer dip handle position.
At the start position your elbows will be straight, but not locked.
Bend body slightly forward, to keep back straight and aligned to lower body.
Gradually lower the body, bending the elbows, with controlled movement to a comfortable level.
Slowly start to straighten the arms to come back up slowly to the start position. At the start position, arms are again extended but not locked.
While doing this exercise, do not swing your body to and fro.Isolate the upper muscles as shown in the illustration.
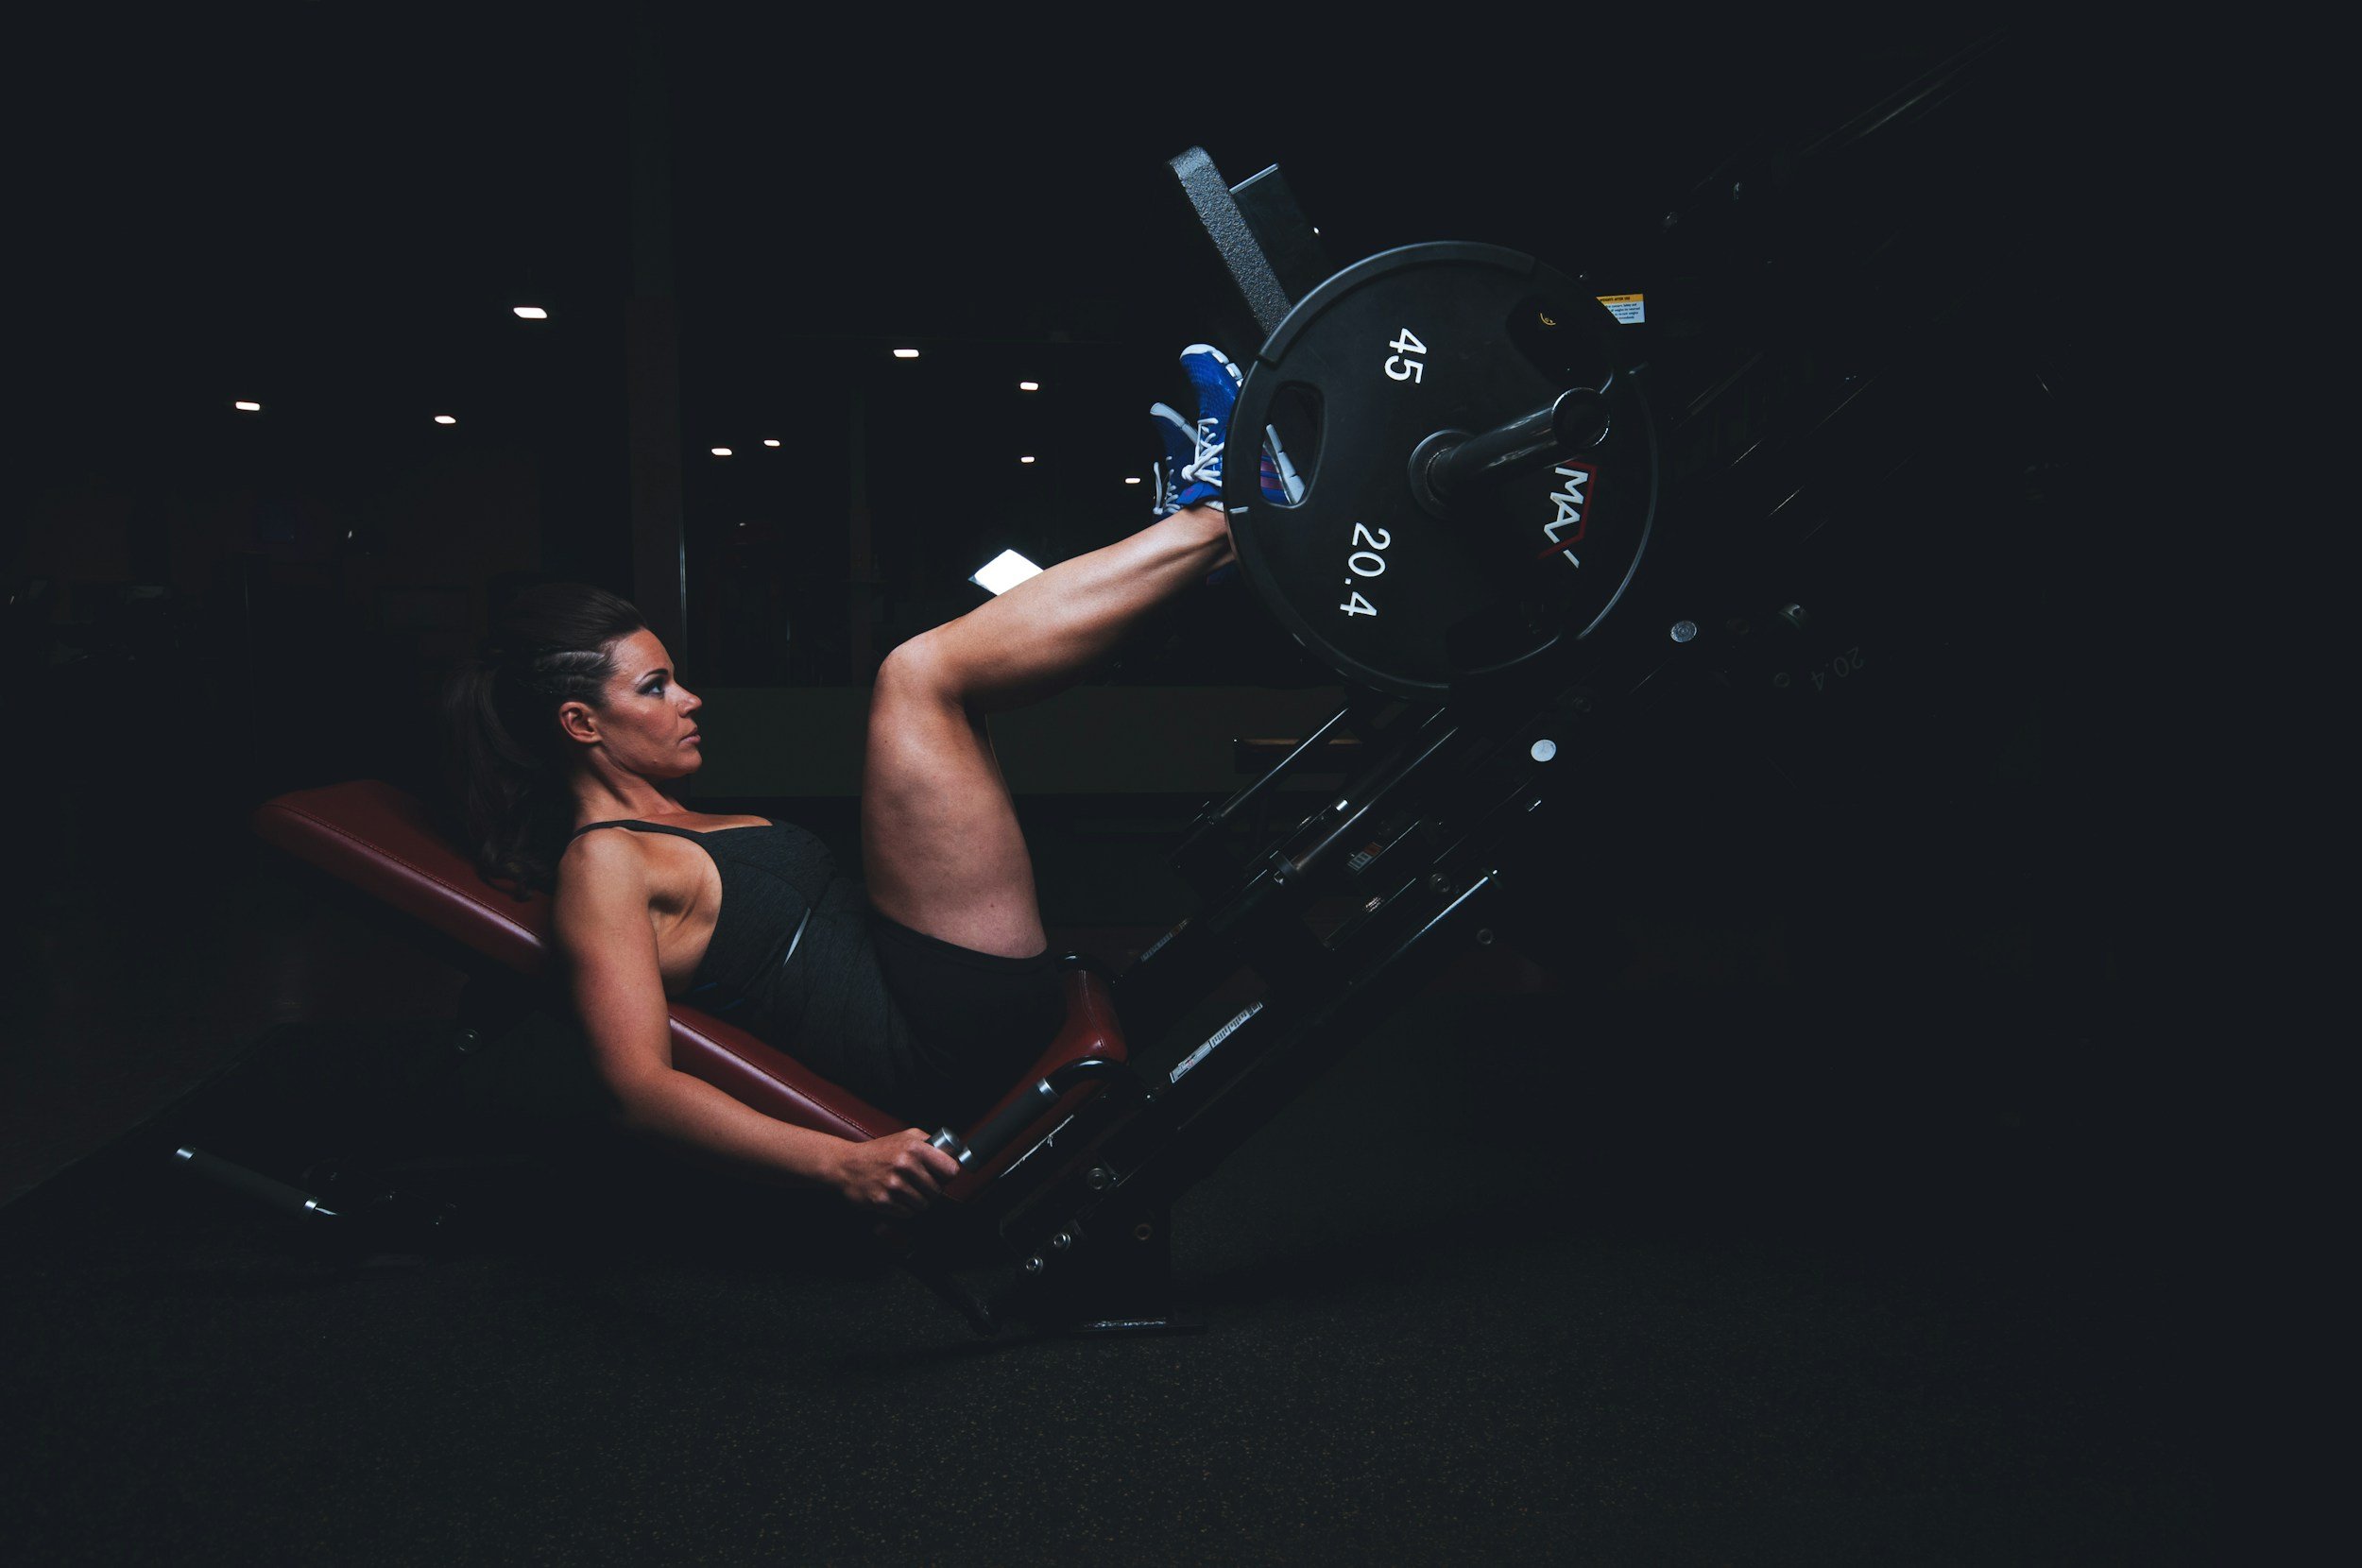
Leg Press
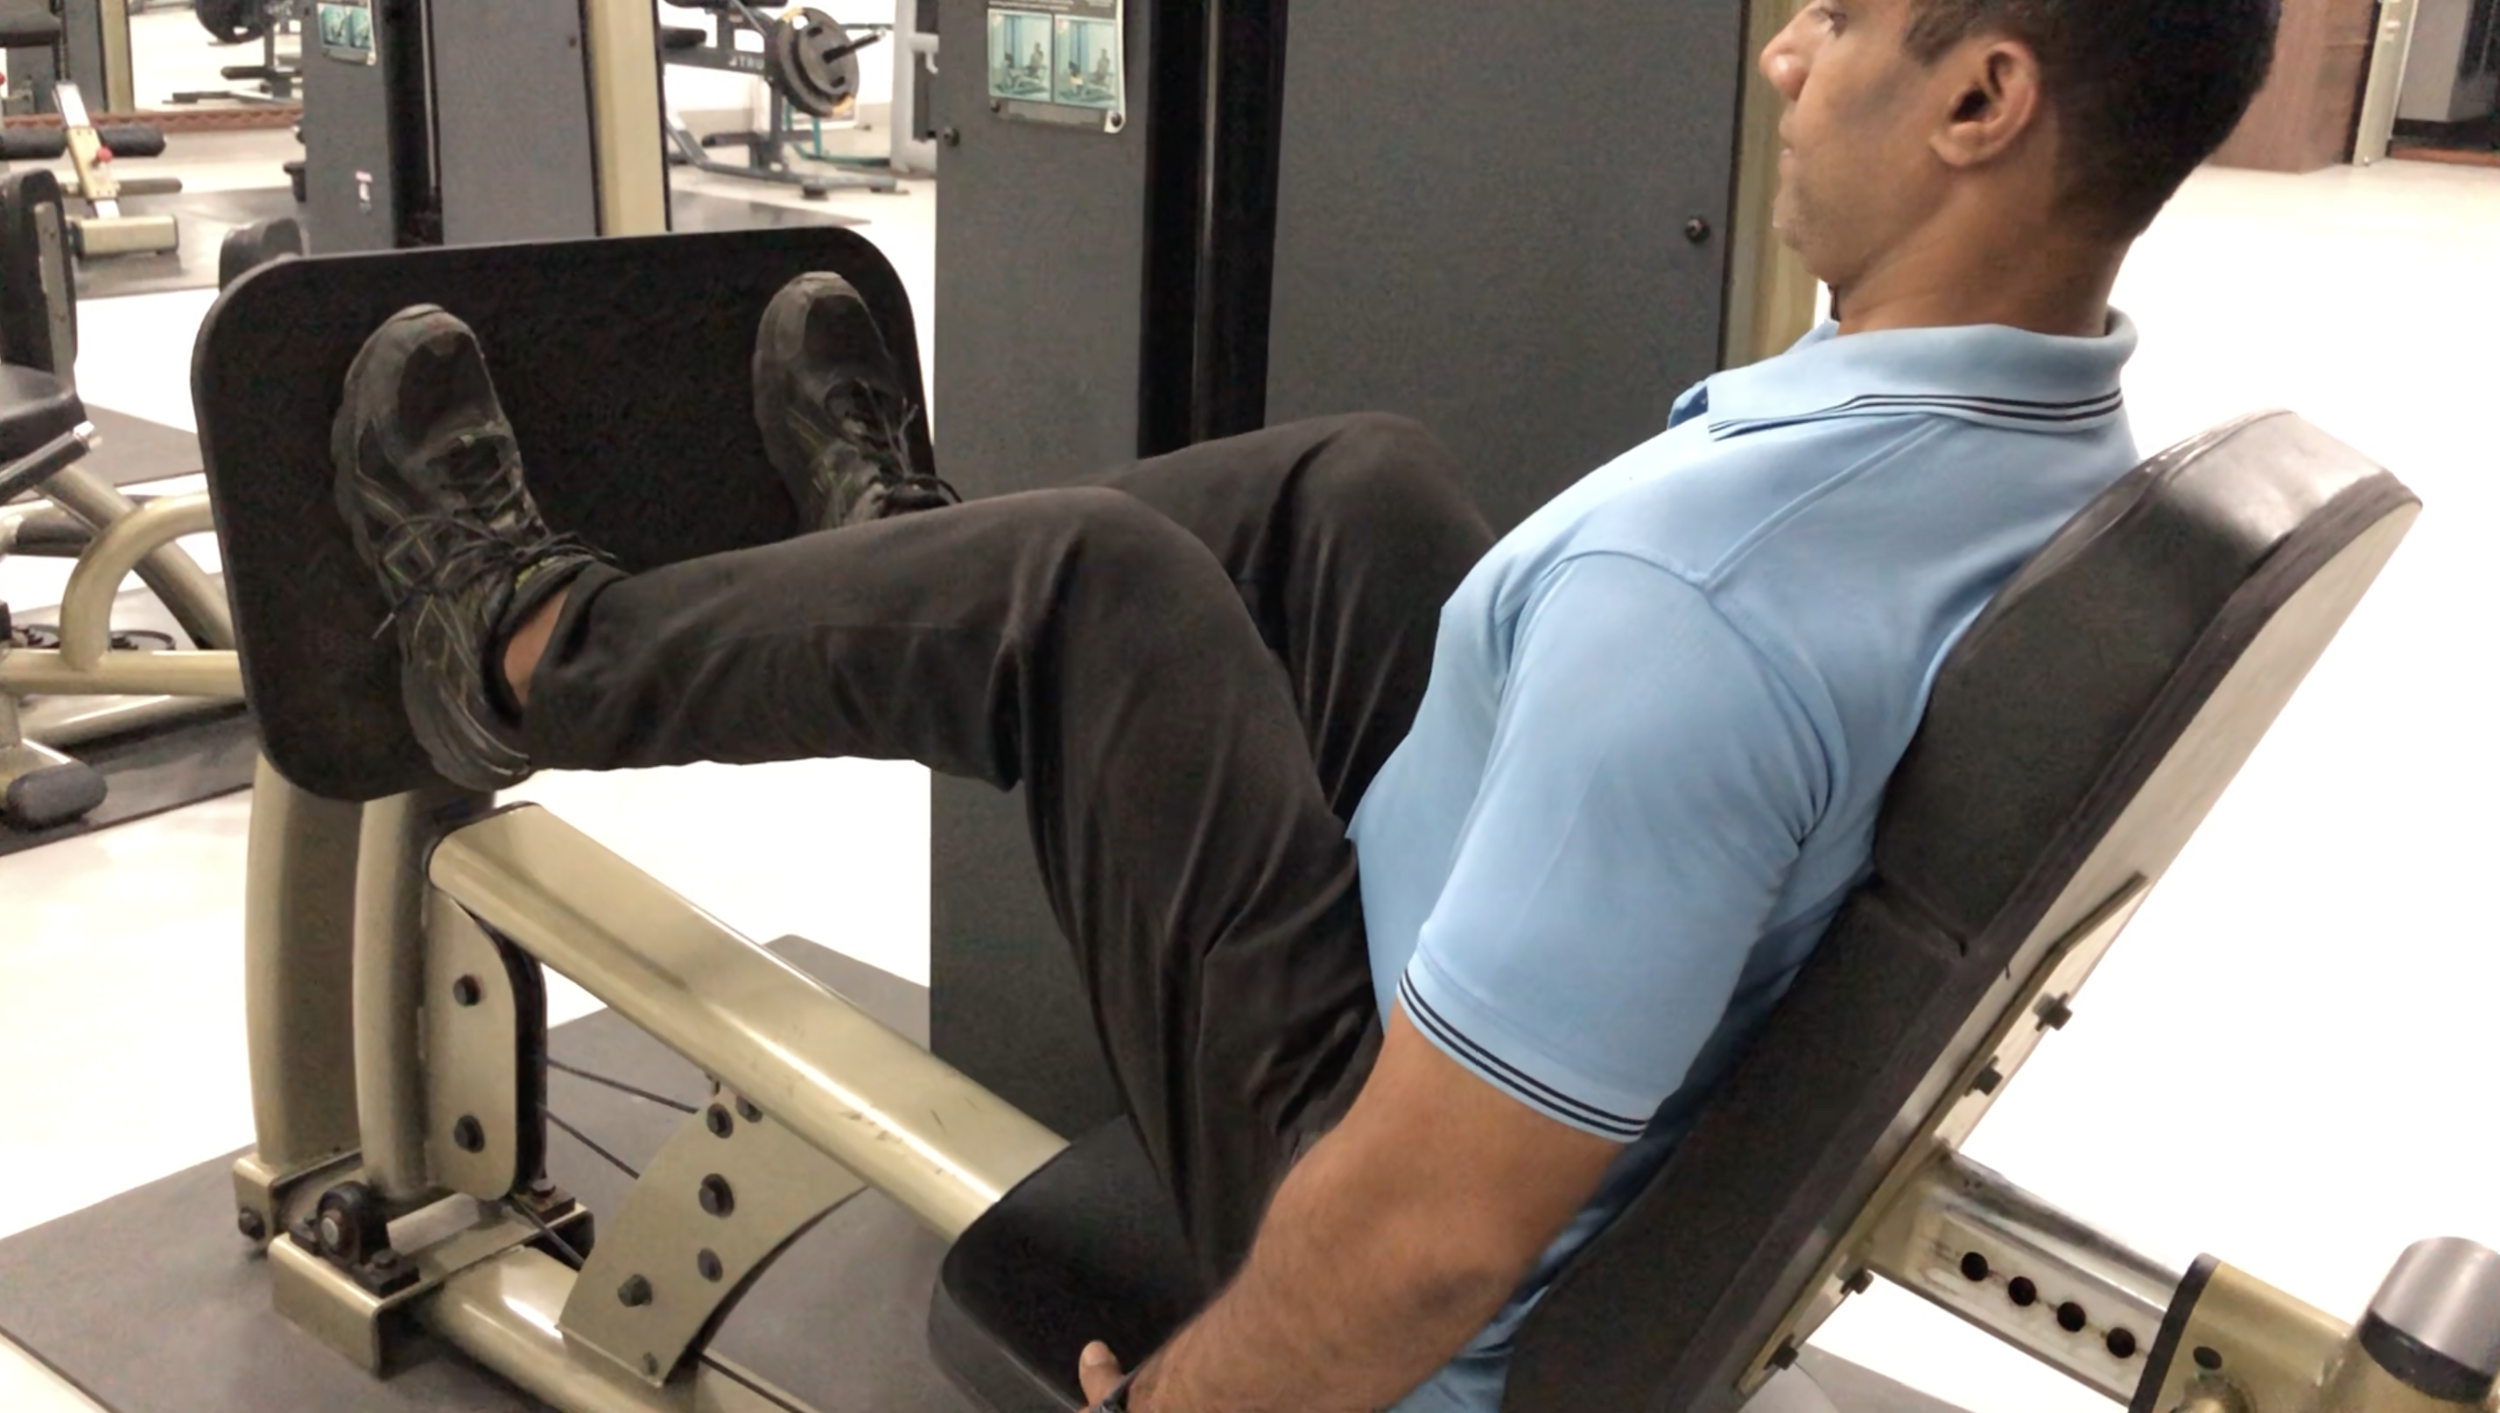
In the machine at NPA, the platform where your legs are placed moves.
This machine is an exception to 4-2-4 rule. It’s 6-0-6.
Sit on seat. Place feet on foot-plate frame.
Slide back all the way until buttocks are against the base of the backrest.
Lean back, with shoulders fully relaxed.Readjust feet on foot plate, hip-width apart either parallel or in a slight V.
If you find this position difficult, adjust the seat position taking it further back.
Use the handholds as support.Lean head against backrest and not strain the shoulders.Knees and hips should be bent as much as possible unless the ROM (Range of Motion) is restricted for health reasons or there is pain.
Take Trainers help if you find it difficult to pull yourself forward.
Now slowly (over 6 seconds) push the foot-plate frame away till knees straighten, but not lock.
Note: don't lock knees at the end, keep them soft
Make sure knees don't splay outwards or roll in.
Without stopping at that position, slowly (over 6 seconds) starts to bend the knees again, bringing the foot-plate frame closer to your body.
Use handholds as support to prevent body sliding down.
Rhythm of exercise: 6-0-6. Push the foot-plate frame over 6 seconds, don't hold at the end (only exercise not to hold), and slowly bring the foot-plate frame back towards the body over 6 seconds.
Have the head rested on the backrest at all times.
Push foot plate slowly (6 seconds) forward with legs, applying the pressure from midfoot and heels.Keep legs (knees) slightly bent in the end position.i.e. legs should not be completely straight/locked.
Move legs (knees) in a straight line between hips and feet, effectively keeping knees shoulder width apart.
Do not let the knees roll in or out.
Make sure that the pressure is exerted solely through the midfoot and heels throughout entire exercise.Make sure body is not sliding down or lifting up during exercise.
Hip Abductor

Leg pads should be facing inwards, i.e. towards each other.
Position Leg Pads all the way in.
Set backrest appropriately, according to your height, such that leg pads are positioned just above the outside of the knees.
Sit down with both Leg Pads on the outside of both your legs.
Your knees will be touching each other.
Slide back until buttocks are against the lower edge of backrest.
Lean back with shoulders relaxed. Place hands on handholds as support.
Place the feet on foot pad.
Knees pointing upwards and are slightly bent, with feet relaxed.
Slowly push the Leg Pads outwards with outside of the thighs, opening the legs as far as possible without arching the lower back.
You should feel a load on the buttocks and outside of the legs.Lower back should be rested at all times and should not arch.
Open legs as far as possible and return to the start position without letting weight drop down.Lower back should remain in contact with the backrest at all times, and should not arch on taking the legs apart.
Make sure that arms and shoulders remain relaxed.
Do not grip handholds too tightly. Grip should be 5-6 on a scale of 10.
Feet should stay relaxed.
While doing this exercise, you should be able to Isolate the gluteus (buttock) muscles.
The load while doing this exercise should only be on gluteus (buttock) muscles.
Hip Adductors

Leg pads should be facing outwards, i.e. away from each other. In this machine the Leg Pads have to be squeezed in.
Position Leg Pads to a midway point.
Note the reading on the ROM scale.
Set backrest appropriately, according to your height, such that leg pads are positioned just above the inside of the knees.
Sit having both Leg Pads in between both your legs, pad touching inside of the thighs.
Slide back until buttocks are against the lower edge of backrest.
Lean back with shoulders relaxed.
Sit tall and keep head upright. Shoulder should be relaxed.
Place hands on handholds as support.Place the feet on foot pad.
The knees are pointing upwards.
Make sure that knees are slightly bent.
Feet are relaxed.
Gradually push against the Leg Pad, squeezing the legs together till they can't squeeze any more.
Hold that position of squeezing the inside of the thighs together. Again, slowly take the thighs out.
Slowly return legs to the start position until feeling a slight stretch on the inside of the thighs, without letting the weights drop down.
Lower back should remain in contact with the backrest at all times, and should not arch on taking the legs apart.
Make sure that arms and shoulders remain relaxed.
Do not grip handholds too tightly. Grip should be 5-6 on a scale of 10.
Feet should stay relaxed.Isolates the muscles, i.e. adductors, the muscles in the inner part of legs.
The load should only be on Adductor muscles and nowhere else.
Leg / Knee Extension


Sit on seat so that your knees (bent) are approximately in line with the axis on the machine on which it moves on the knees being bent.
Position backrest against your buttocks and lean back fully.
Hold the hand grips on both sides and shuffle back all the way.
Place your lower legs behind the Foot Roll.
Pull the thigh roll pin with the right hand and pull the thigh roll towards you with your left hand till the thigh roll rests firmly on your thigh and locks.
Point toes up and to have legs hip-width apart.
Slowly straighten legs until straightening the legs as far as comfortable (achieving the target ROM) and then to return to slowly the start position.
Keep your toes pointing towards knees throughout the exercise.
Make sure you keep your neck and hands relaxed.You should not grip handholds too tightly.
Make sure that lumbar spine remains in contact with backrest, and not arch.
There is a tendency to arch the back when the weight is too high or at the end of the range.
Do not lift your knees in finish position, effectively losing contact with pad.
This way you will loose the correct alignment with axis.
Check that you isolate the muscles that need to be worked on, i.e. quadriceps.
Remind yourself to relax rest of the body.
The load, while doing the exercise, should only be on the frontside of the thighs, i.e. quadriceps.
If it is straining anywhere else, you should restart, change settings or reduce weight.
Leg / Knee Flexion

Set backrest in a position such that when you bend your knees, the knees should be inline with the axis on which the machine moves on knees being bent.
Pull up the Thigh Roll.
Sit on seat so that the knees are approximately in line with the axis on the machine on which it moves on the knee being bent.
Position backrest against your buttocks and lean back fully.Hold the hand grips on both sides and shuffle back all the way.
Place lower legs between foot pad and thigh pad.
Pull the thigh roll pin with your right hand and pull the thigh roll towards yourself with your left hand till the thigh roll rests firmly on your thigh and locks.
Point toes up and to have legs hip-width apart.
Check the point of contact between the lower legs and the Foot Roll.
There should be no play between lower legs (Achilles) and Foot Roll throughout the exercise.
Re-position yourself if necessary.
Align axis and relevant joint.
Slowly bend legs until achieving the target ROM and then to slowly return to the start position.
Keep your toes pointing towards knees throughout the exercise.
Make sure you keep your neck and hands relaxed.
You should not grip handholds too tightly.
Make sure that lumbar spine remains in contact with backrest, and not arch.
There is a tendency to arch the back when the weight is too high or at the end of the range.
Do not lift your knees in finish position, effectively losing contact with pad.
This way you will loose the correct alignment with axis.
Check that you isolate the muscles that need to be worked on, i.e. hamstrings.
Remind yourself to relax rest of the body.
The load, while doing the exercise, should only be on the backside of the thighs, i.e. hamstrings.
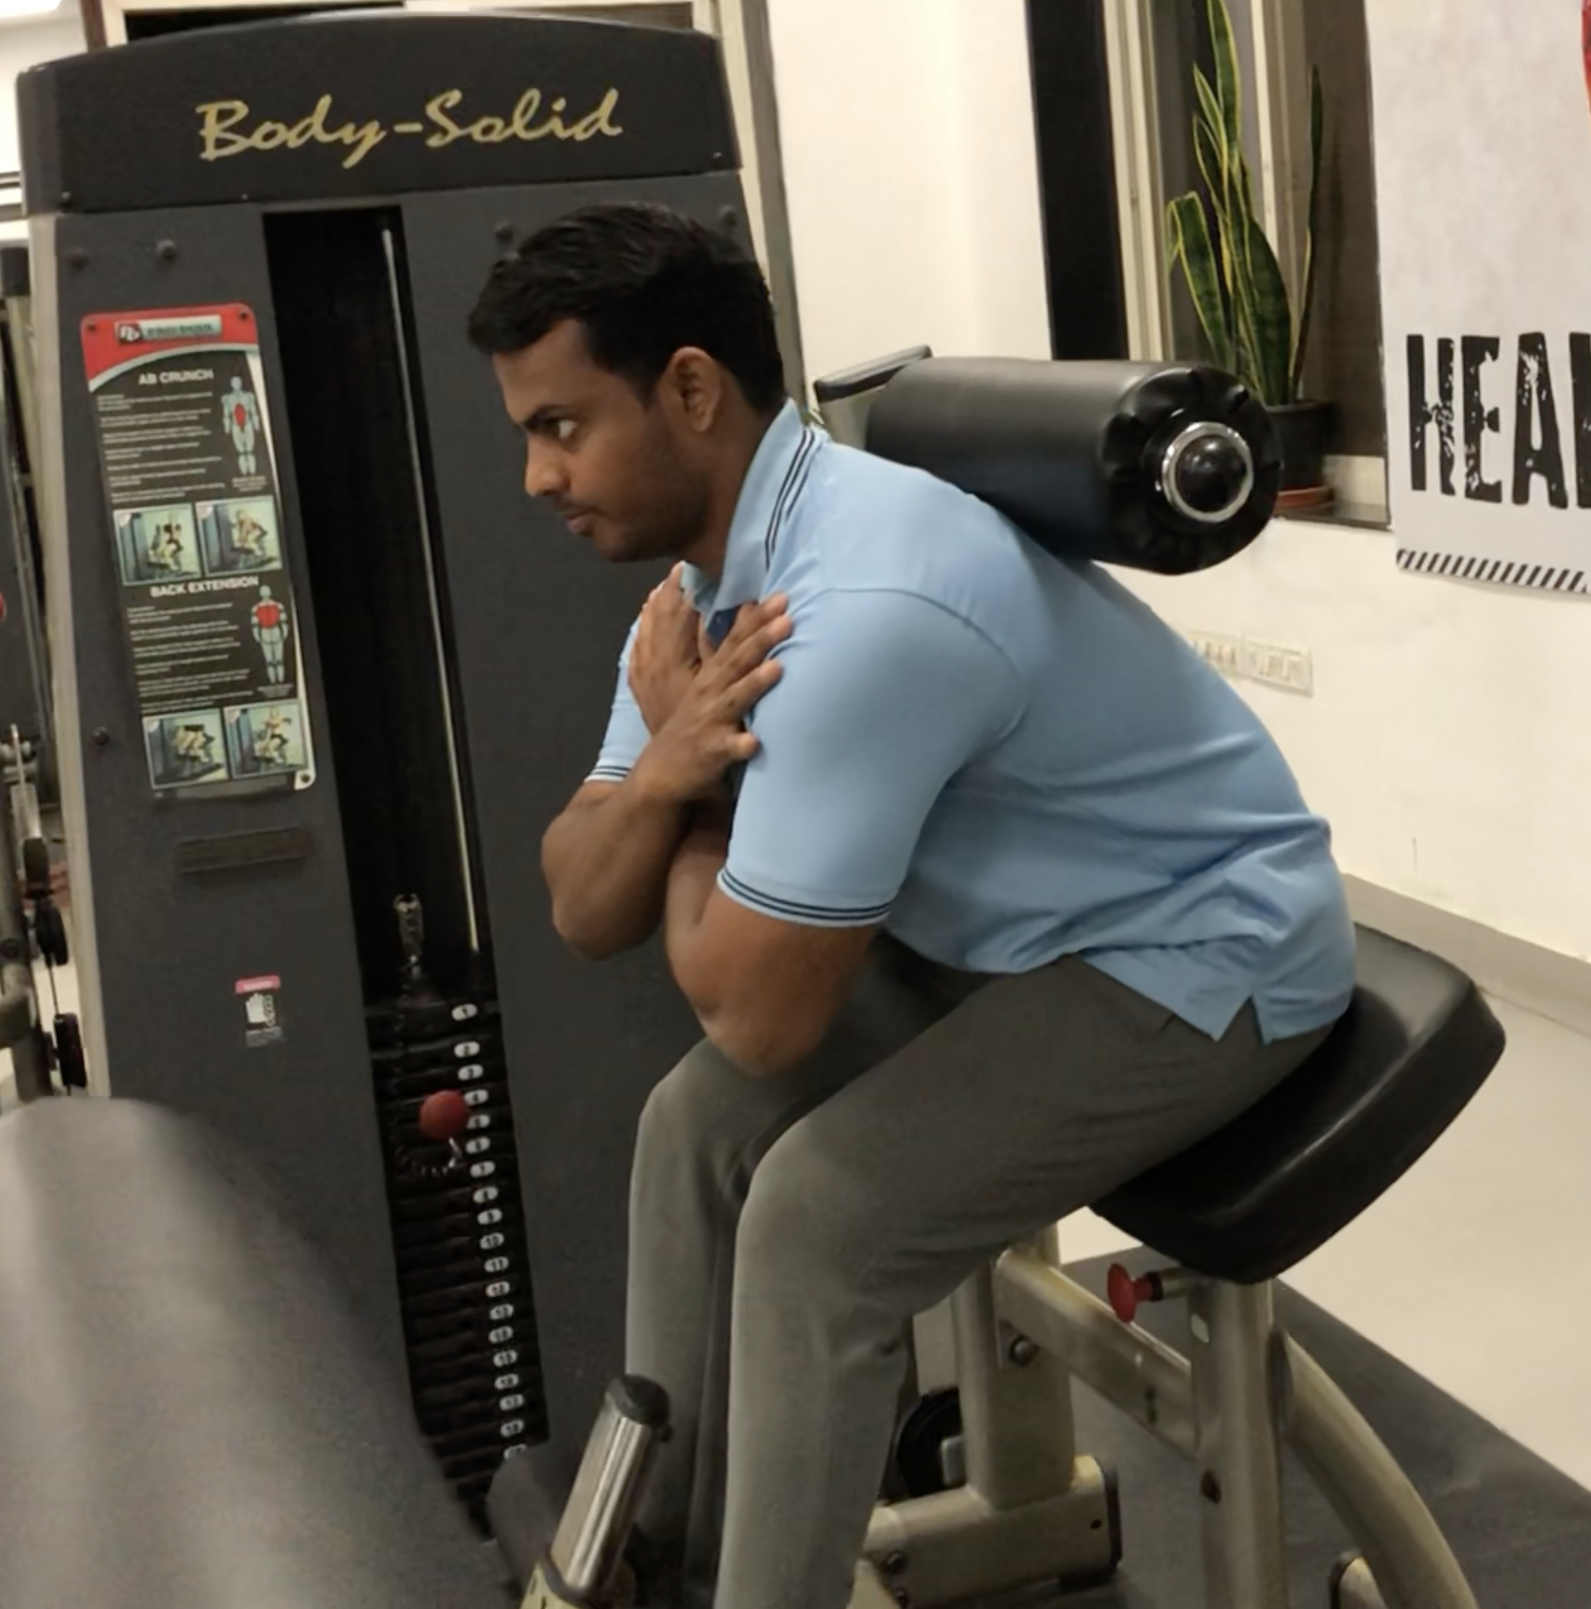
Back Extension
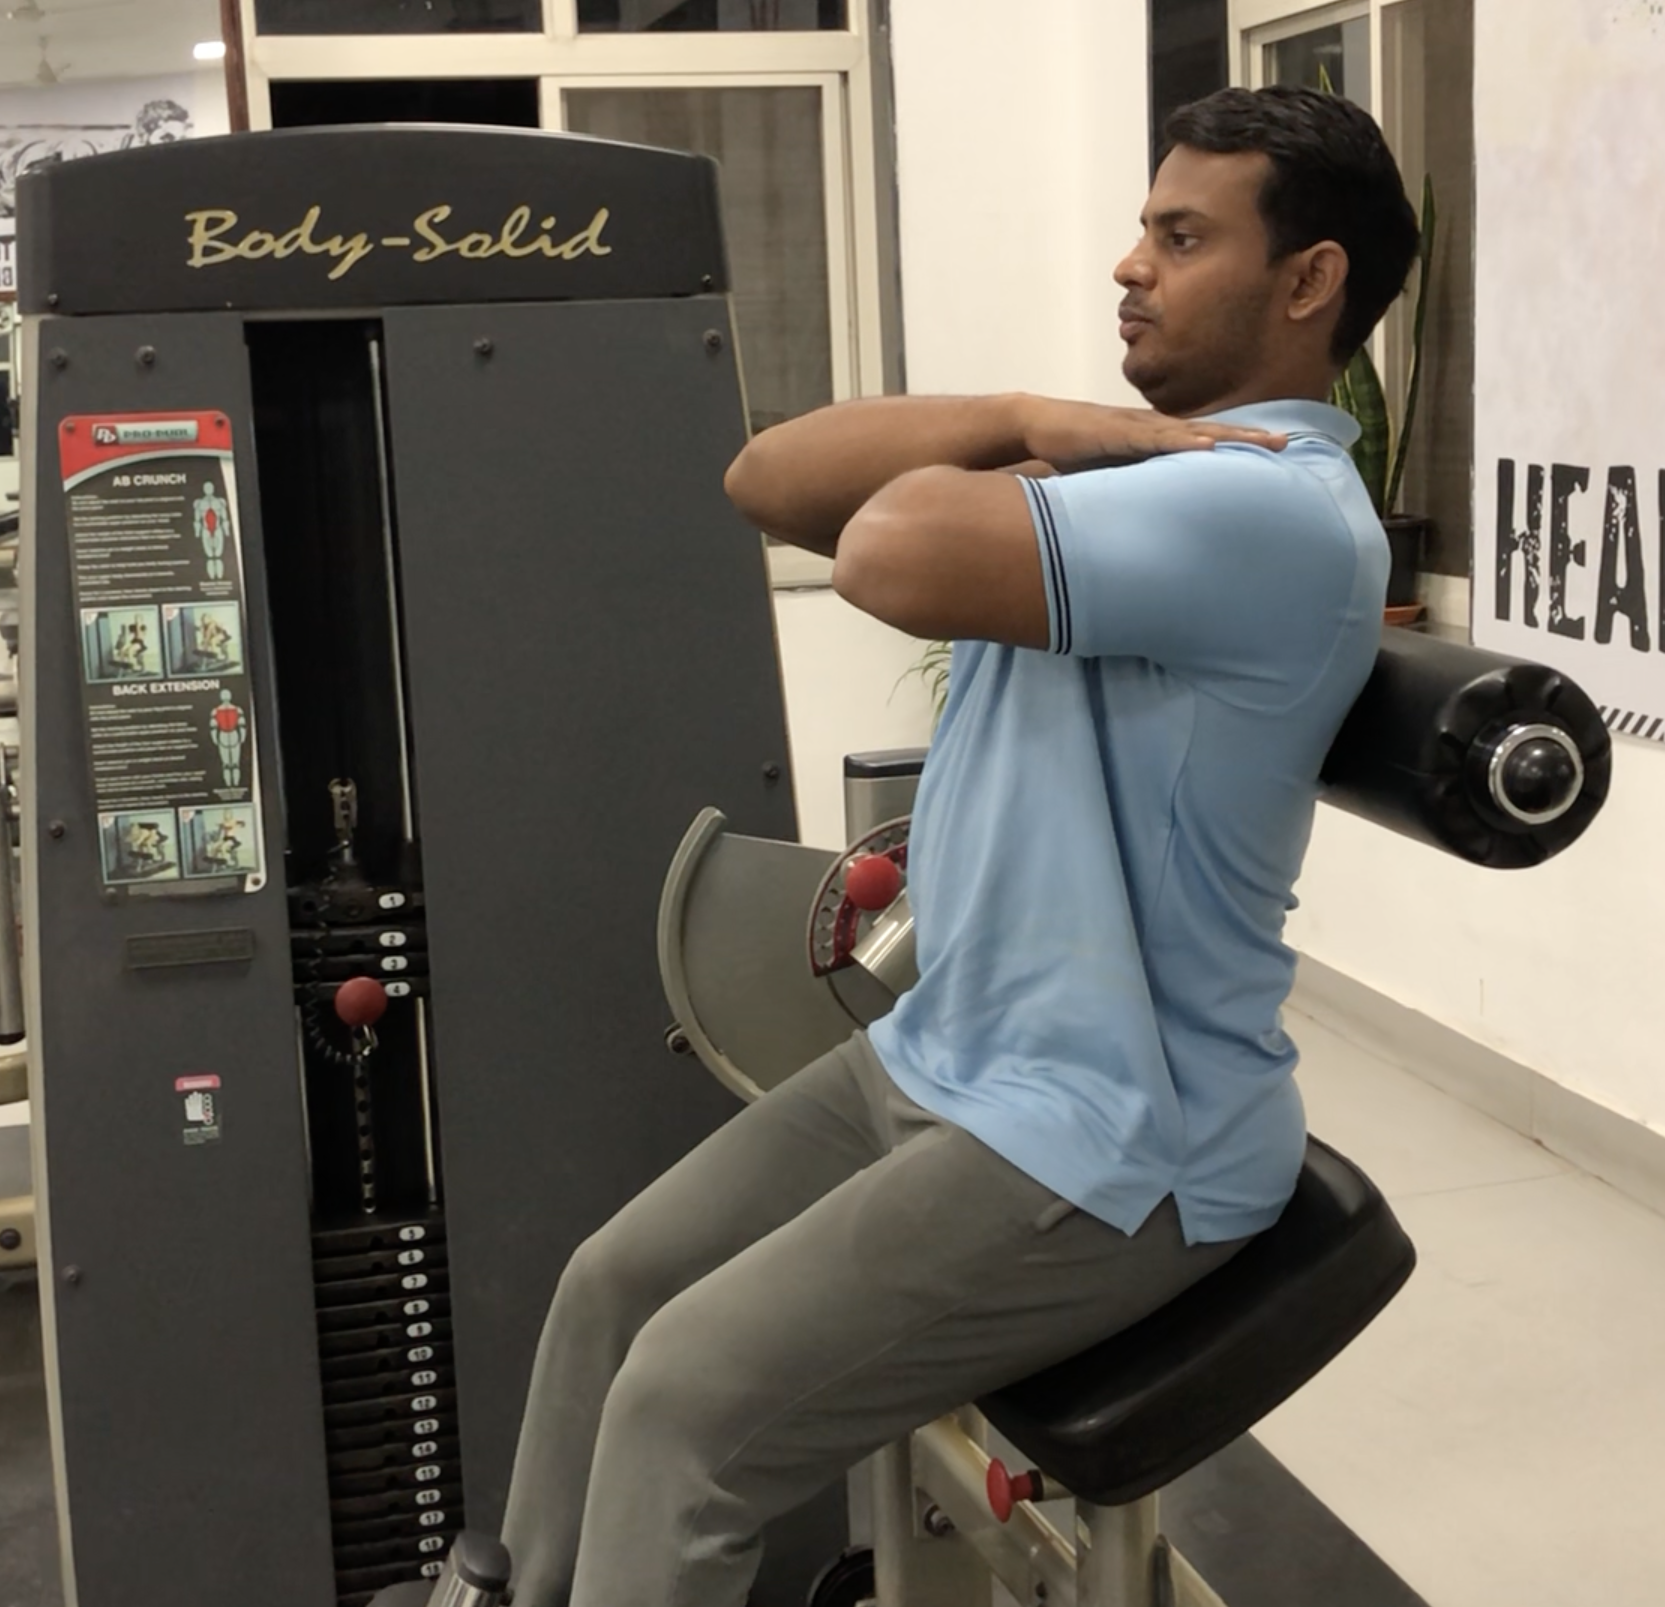
Set seat height such that your hips are in line with the axis (pivot point) on which the machine moves when you push your upper back against the Torso Roller.
Have the setting (3-6) on the lever hand of Torso Roller midway such that you can shuffle into the seat with their torso bent forwards.
Torso Roller needs to be pushed back.
Have Foot Pad at a level that your feet are firmly stabilised and that hips are in line with the axis (pivot point).
Sit on seat, while bending forwards.
Set seat height such that your hips are in line with the axis (Pivot Point).
Shuffles buttocks all the way back and adjusts the Torso Roller at a comfortable position on the upper back.
Put your feet on the Foot Pad such that they are firmly stabilized and don't slide forwards and hips are inline with Axis (Pivot Point).
Your knees need to be hip width apart and legs to be relaxed at all times.
Cross hands across chest.
This becomes the Start Position.
Torso Roller needs to be pushed back from here.
Point toes towards knees and to place legs hip-width apart.
Check the point of contact between the Upper Back and Torso Roller.
There should be no play between Upper Back and Torso Roller throughout the exercise.
Slowly stretch upper body back as far as comfortably possible and slowly return to the start position.
Refrain from pressing down with legs or lifting buttocks from pad.
Push should only come from upper back on Torso Roller.
Remember to isolate the muscles.
You should feel the load on the lower back muscles.